
I am so encouraged by all of the positive feedback from you all! I have to admit that starting this new phase is a bit intimidating, and realizing that people actually read this is exciting and scary all at the same time. I hope you will be patient with me as I learn how this blog stuff works, and figure out how to balance working full-time, keeping house, planning an 8-week trip to Europe (more on that later!!!) AND blogging consistently on top of all that.
Throughout my life, one thing has been certain: I usually bite off more than I can chew. Whether that’s in activities, or jobs, or projects… I get excited in the beginning and then go a little, well, crazy. To help offset that tendency, I am going to start off with one or (at the max) two substantial blog posts per week. I have so many great ideas in queue that I just can’t wait to show you all BUT I will simply have to bite my tongue and be patient. Hmph.
Meanwhile, here are some things you can be looking forward to in the future:
- – Knitting tips and featured links to great online resources
- – Repurposed projects
- – Beginner knitting lessons
- – Sourdough technique/bread baking
- – Europe trip plans and pictures!
- – Wedding flowers
- – “WBC” – posts on some favorite Wines, Beers, and Coffees
- – And more!
Now. To knitting.
But first, one more thing (sorry).
If you have never knitted before in your life, but are somewhat interested in starting, I hope that these projects serve as inspiration rather than intimidation for you to start! Unless you are a prodigy, you probably won’t be able to jump into clothing or crazy cables or lace right away. My hope is that these posts will show you the endless modern/stylish possibilities and that knitting isn’t just for grannies and crazy Christmas sweaters!
Okay, NOW we can knit.
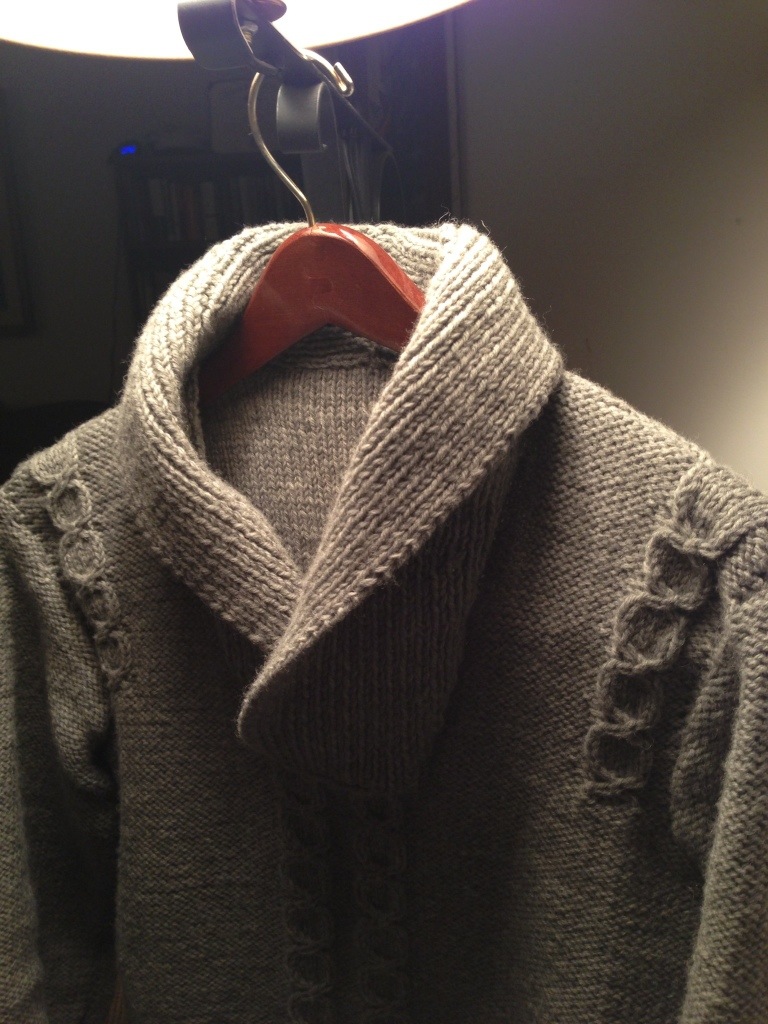
This is a no-named, no copyrighted pattern I found while weeding through an online list of some crazy, 1970 and 1980’s styled sweater patterns . I will just say that there is some crazy ugly stuff out there. And some that are just shocking. This vintage find was a pearl among , um, non-pearls, and decided to give it a go for my husband. I love how the good parts of fashion tend to come back around in style! I loved the shawl collar, and the center and side detailing adds so much. Those rings are quite simple if you are familiar with any sort of cabling. The main sections are in reverse st st, which give it a different look than normal knitted items.

I don’t know if it’s just me, but I HATE seaming. So figuring out how to seam on the collar was a bit trying for me, and it took me several tries to get it to fit right. I ended up using mattress stitching around the edges, and then your basic sewing stitch for the overlapping section in the front.

Sizing (measured around largest point of chest):
Small (32-34 in)
Medium (36-38 in)
Large (40-42 in)
Extra large (44-46 in)
The pattern will reflect the modifications for each size in the parenthesis as such:
S(M-L-ExL)
Supplies:
– Valley Yarns Northampton 100% Wool, Light Grey (100 g balls) — 6(7-7-8)
– Knitting needles: 1 pair each No. 5 US and 7 US
– 1 Cable needle
Gauge: 9 sts — 2 inches 6 rows = 1 inch
Yarn Weight: Worsted
Notes and Definitions:
All increases are made by picking up the thread lying between the last st and the next st and knitting into the back of it.
FC3 = Sl next st onto cable needle and hold in FRONT of work, k next 2 sts, k st from cable needle
BC3 = sl next 2 sts onto cable needle and hold in BACK of work, k next st, k 2 sts from cable needle
Twist2 = P 2, skip next st, p into front loop of next st, p skipped st
Cable Pattern Stitch for Back and Front Armholes: To be worked on each Group of 6 sts as designated.
Row 1: FC 3, BC3.
Row 2: Twist2, p 2.
Row 3: BC 3, FC 3.
Rows 4 and 6: P 6.
Rows 5 and 7: K 6.
Row 8: P 6.
Repeat these 8 rows for cable pattern stitch for back and front armholes.
Cable Pattern Stitch for Front: To be worked on 17 sts as designated.
Row 1: FC 3, BC 3, p 5, FC 3, BC 3.
Row 2: P 2, Twist2, p 2, k 5, p 2, Twist2, p2.
Row 3: BC 3, FC 3, p 5, BC 3, FC 3.
Rows 4 and 6: P 6, k 5, p 6.
Rows 5 and 7: K 6, p 5, k 6.
Row 8: Repeat Row 4.
Repeat these 8 rows for cable pattern for front.
BACK:
Using smaller needles, cast on 79 (89-99-109) sts.
Row 1: P 1, * k 1, p 1, repeat from · across Row.
Row 2: K 1, * p 1, k 1, repeat from * across Row.
Repeat these 2 rows for 2 inches, ending with Row 2.
Change to larger needles and starting with a p Row, work even in reverse stockinette st until piece measures 18 (18 ½ -19-19 ½ ) inches or desired length to Underarm, ending with a k Row.
Shape Armholes:
Rows 1-4: At the beg of each row, bind off 5 (6-7-8) sts — 59 (65-71-77) sts.
Row 5: P 2 (3-4-5), k 3, inc 1 st, k 2, p 45 (49-53-57), k 2, inc 1 st, k 3, p 2 (3-4-5) — 2 sts inc.
Row 6: K 2 (3-4-5), p 6, k 45 (49-53-57), p 6, k 2 (3-4-5).
Row 7: P 2 (3-4-5), put a marker on needle, work Row 1 of cable pattern st for armholes on next 6 sts, put a marker on needle, p to last 8 (9-10-11) sts, put a marker on needle, work Row 1 of cable pattern st for armholes on next 6 sts, put a marker on needle, p 2 (3-4-5).
Row 8: K 2 (3-4-5), work Row 2 of cable pattern st for armholes on next 6 sts, k 1, inc 1 st, k to I st before 3rd marker, inc 1 st, k 1, work Row 2 of cable pattern st for armholes on next 6 sts, k 2 (3-4-5) — 2 sts inc.
Continue to work each group of 6 sts between markers in cable pattern st for armholes and remaining sts in reverse stockinette st.
Inc 2 sts (as explained above) every 8th Row, 5 times more — 73 (79-85-91) sts. Work even in pattern as established until armholes measure 8 (8½ -9-9½) inches.
Shape Shoulders:
At the beg of each of the next 4 rows bind off 8 (9-9-10) sts. At the beg of each of the next 2 rows bind off 8 (8-10-10) sts. Bind off remaining 25 (27-29-31) sts.
FRONT:
Using smaller needles, cast on 79 (89-99-109) sts.
Repeat Rows 1 and 2 of back ribbing for 2 inches, ending with Row 2.
Change to larger needles.
Increase Row: P 32 (37-42-47), k2, inc 1 st, k 3, p 5, k 3, inc 1 st, k 2, p 32 (37-42-47) — 81 (91-101-111) sts.
On the next Row k 32 (37-42-47), p 6, k 5, p 6, k 32 (37-42-47).
Row 1: P 32 (37-42-47), work Row 1 of cable pattern st on next 17 sts, p 32 (37-42-47).
Row 2: K 32 (37-42-47), work Row 2 of cable pattern st on next 17 sts, k 32 (37-42-47). Continue to work 17 sts between markers in pattern st and remaining sts in reverse stockinette st until piece measures 18 (18½, 19-19½) inches or desired length to underarm, ending with a wrong side row.
Shape Front Opening and Armholes:
Discontinuing cable pattern st on 17 sts between markers and removing markers, on the next Row p 31
36-40-44), sl remaining sts onto a holder.
Left Side Armhole:
Row 1: Knit.
Rows 2 and 4: At arm edge bind off 5 (6-7-8) sts, work to end of Row.
Rows 3 and 5: Knit.
Row 6: P 2(3-4-5), k 3, inc 1 st, k 2, p 14(16-17-18).
Row 7: K 14 (16-17-18),p 6, k 2(3-4-5).
Row 8: P 2 (3-4-5), put a marker on needle, work Row 1 of cable pattern st for armholes on next 6 sts, put a marker on needle, p 14 (16-17-18).
Row 9: K 2, s1 1 as if to k, k 1, psso (neck dec), k to 1 st before marker, inc 1 st, k 1, work Row 2 of cable pattern st for armholes on next 6 sts, k 2 (3-4-5).
Continue in this manner to work 6 sts between markers in cable pattern st for armholes as established and remaining sts in reverse stockinette st, and AT THE SAME TIME, dec 1 st at neck edge every 8th Row, 3 (4-4-4) times more and inc 1 st before first marker 5 times more.
When all shaping has been completed, work even in pattern as established on 24 (26-28-30) sts until armhole measures 8 (8½ -9-9½) inches.
Shape Shoulder: At arm edge bind off 8(9-9-10) sts twice and 8(8-10-10) sts once.
Right Side Armhole:
With right side facing you, sl 50 (55-61-67) sts onto larger needles. Join yarn at neck edge and bind off 1 9(19-21-23) sts, p to end of Row. K 1 Row, p 1 Row. Finish to correspond to left side, reversing all shaping and placing of armhole pattern st.
SLEEVES:
Using smaller needles, cast on 43 (45-47-49) sts.
Repeat Rows 1 and 2 of back ribbing for 3 inches.
Change to larger needles. Starting with a p Row, work in reverse stockinette st, inc 1 st each end of needle and repeat this inc every 4th Row, 11 (12-13-13) times, putting a marker in each side of work when piece measures 18 (18½ -19-19½) inches.
Work even in reverse stockinette st on 67 (71-75-77) sts until piece measures 20 (21-22-23) inches.
Shape Cap:
At the beg of each of the next 2 rows bind off 5 (6-7-8) sts. At the beg of each of the next 6 (8-10-10) rows bind off 7 (6-5-5) sts. Bind off remaining 15 (11-11-11) sts.
COLLAR, Left Side:
Using larger needles, cast on 23 (23-25-27) sts. Repeat Rows 1 and 2 of back ribbing once.
At the beg of the next Row inc 1 st, then inc every other Row 3 (3-5-7) times more, forming new ribs as sts are inc.
Work 1 Row.
On the next Row inc 1 st at same edge and repeat this inc every 4th Row, 5 times more, ending at straight edge.
The following “Short Row” sets are broken up into 3 sets, just so it’s a bit easier to manage (not to confuse you!). I had a bit of a hard time keeping track here, so I would recommend noting on paper what row and what short row set and what number of each short row set you are on as you go along.
Short rows, set 1:
Row 1: Work to last 6 sts.
Row 2: Turn, work to end of Row.
(Work 3 rows. On the next Row inc 1 st at shaped edge of collar) twice.
Repeat the last 10 rows twice more. Put a marker at shaped edge of last Row.
Repeat Rows 1 and 2 of short rows, set 1.
Work even on all sts for 4 rows.
Short Rows, set 2:
(Row 1: Work to last 18 sts. Row 2: Turn, work to end of Row. Work even for 4 rows.) four times (for a total of 24 rows).
Short Rows, set 3:
Row 1: Work to last 6 sts.
Row 2: Turn, work to end of Row. Work even for 2 (2-4-6) rows, ending at straight edge of collar.
Shape Center Back:
Short Rows:
Row 1: Work to last 6 sts.
Row 2: Turn, work to end of Row.
Row 3: Work to last 12 sts.
Row 4: Turn, work to end of Row.
Row 5: Work to last 18 sts.
Row 6: Turn, work to end of Row.
Row 7: Work to last 24 sts.
Row 8: Turn, work to end of Row. Sl sts onto a holder. Work right side of collar to correspond to left side, reversing all shaping. Place the two pieces tog, right sides facing and bind off tog in ribbing the 2 sets of sts.
FINISHING:
Sew underarm, shoulder and sleeve seams to markers. Set in sleeves. Sew shaped edge of collar to neck edge, overlapping at center front.

not going to lie, that is intimidating, but it looks great! How long did it take you to knit it?
It took me about 5 weeks, knitting in the evenings and on weekends. The hardest part is keeping track of the shaping in the armhole/shoulders and collar. None of the actual stitches are difficult; just takes concentration!
TIA! This sweater is incredible. I’m putting Joe on the waiting list for a sweater 😉
This is wonderful! What a beautiful gift! I’ve never attempted a sweater for my husband although I LOVE to knit. Maybe one day! Right now I need to knit something for my new baby… who already arrived 4 weeks ago. Whoops!
Thanks! Aww, congratulations on your newborn! I’m sure whatever you make will be beautiful. They grow so fast at that stage, so I bet your baby will love a new wardrobe soon anyway =)
Go Girl!
This looks great Tia. Keep at it.
Grampa
Ahhhh! What an amazing pattern!!! I have been such a bad knitter this past winter (lots of half-done projects, none finished!) and this inspires me to finish them ALL so I can cast on for this beauty!
You can do it! One of my favorite ways to set aside time to knit is to listen to a really engaging audiobook at the same time. Time flies and I also tend to knit really fast during the exciting parts! Good luck!
IS this Tyler’s finished sweater? I’m sure he wears it with great pride. Not many woman now adays can knit their husbands a sweater let a lone one like this, Terrific Work Tia!
Yes it is! He loves it =) thanks!
Wow that was unusual. I just wrote an very long comment but
after I clicked submit my comment didn’t appear. Grrrr… well I’m not writing all that over again.
Regardless, just wanted to say excellent blog!
Aw I totally understand… Computers can be persnickety sometimes! Thanks for the kind words; glad you like the blog!
Having problem with the collar! Help, rest of sweater is done….spinning in the dirt with it for unknown reason!
Aww so sorry to hear! Shoot me an email at fibreandspice@gmail.com if you have a specific question and I can try to help!
I’ve reach the point of the short rows (I’ve worked short rows heaps of times before) but I’m a bit confused by the directions:
“Short rows, set 1:
Row 1: Work to last 6 sts.
Row 2: Turn, work to end of Row.
(Work 3 rows. On the next Row inc 1 st at shaped edge of collar) twice.
Repeat the last 10 rows twice more. Put a marker at shaped edge of last Row.”
Do we wrap and turn the first short row? The next 3 rows as shory rows as well? Do we do the 2 incs before, after or during those next 3 rows? Then it says to repeat the last 10 rows 2 times more…which 10 rows, exactly? There are only 5? After the Short rows begin? Sorry. Just quite confused and could really use some help…
Okay. Started working it. Got it. Duh. Sorry. 😉
Okay…so I decided to just roll with it. New mantra: “trust in the pattern”. I’ve gone ahead and begun knitting as written except in doing that, I find there are only 9 rows to repeat 2x (in the 1st short rows segment ) rather than the stated 10…I’m going to continue as such and hope for the best. Let me know if you can tell me if you can intuit thay I’ve interpreted something horribly wrong…Thanks. 🙂
Nevermind. Got it.
So glad! Apologies if it was confusing! Let me know if you have any more questions.
Hi Amber,
Are you on Row 8 of the last section for the collar? Do you get what she means by reverse all shaping? Aren’t you just supposed to make the exact same thing, and bind them together? Any help on what you did here would help! So close to being done so don’t want to mess up now:)
I responded to you by email =). Let me know if you have any other questions! Good luck!!
Hello!
I’m at the very end of the pattern and not sure what to do!
Row 8: Turn, work to end of Row. Sl sts onto a holder. Work right side of collar to correspond to left side, reversing all shaping. Place the two pieces tog, right sides facing and bind off tog in ribbing the 2 sets of sts.
Can you help clarify this for me? What stitches do I slip onto a holder? and when you say work in reverse, does that mean I would do short row set 3, 2, 1, and then do decreases rather than increases?
Any help would be great as I’m hoping to finish by Christmas. It’s been easy to follow so far!!
Thanks,
Lesley
Pingback: Knit, Purl… | My Homespun Haven·
Hello, I made this sweater but am having a hard time sewing the sleeves in. The pattern tells you to place a marker about 3 inches down from the top of the under arm of the sleeve. Im not sure why and the pattern doesnt explain, but the sleeve is about that amount smaller than the body where it is sewn. Can someone give me some advice? Thank you
Hi Shauna! I’m having a hard time finding where the marker is you’re referring to. If you’d like to send a couple photos to fibreandspice@gmail.com I’d be happy to see if I can help!
Hello, Thank you for answering so quickly. I made this sweater for my son and as you can see I made it without the cables; he didnt like them but loved the shape of the sweater. I dont understand the reason for the marker toward the top of the sleeve and was wondering if it has something to do with fitting the sleeve to the body. My sleeve seems a bit small for the arm opening on the body. I would prefer to sew the sleeve in flat and then sew the side and sleeve seams after; if possible. Thank you so much for your help, Shauna
Date: Thu, 24 Sep 2015 01:48:52 +0000 To: swanzie7@hotmail.com
For two weeks I have tried to get the instructions for this pattern (irish collared pullover). But when I try to iprint it, my pc comes up with the notation n “mo picture’: and therefore not print anything! Couuld you e-mail the instructions – threereag@hotmail.com. I would really appreciate it . Thanks, Beth Reagan
Hi, What a great sweater! I am not a fan of reverse stockinette though and I think I will try it in regular stockinette. It would be helpful if you if posted the problem solving responses to people’s questions here as well as emailing them. Thanks!